eBoard ①⑧⑨
Written for SIA 2017/2018
[ ✍️ ] GENERAL INTRODUCTION

This tutorial is a brief introduction on how to use this headerfile. More...

This tutorial is a brief introduction on how to use this headerfile.

General

Hardware

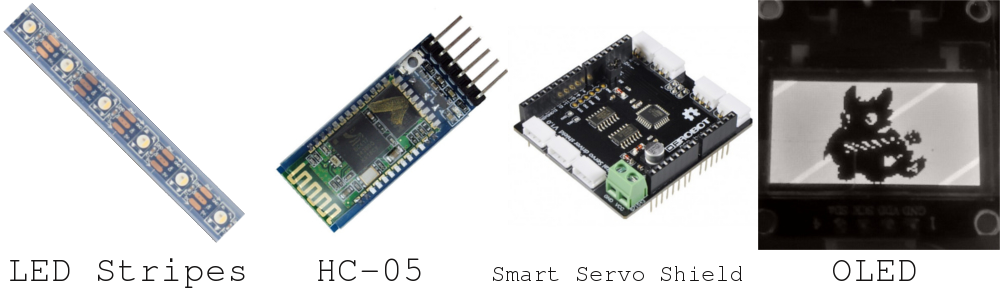
This header is compatible with:

Several functionalities like AX12Servo need special hardware:

Software

This headerfile was created to enable the port of qfixSoccerBoard code to the Arduino platform. Therefore there are a few changes when coding for the arduino:

This is an example code (doing nothing but compile :D) – if you added this as a library

#include <eBoard.h>
int main() {
//cool stuff in here ;D
return 0;
}

Somthing about macros

The Header eBoard.h contains all the classes, features etc.
As you need just some of those features you're able to control them with macros.
A macro is defined like this:

#define <NAME> [<VALUE>]

They have to be defined before the include line of this header to have any effect!

E.g. to disable the Debug Mode (which will save around 1kb of progmem) you'll have to write:

#define EBOARD_DEBUG_MODE 0x0

A list of all Macros can be found at Macros and Constants ;)
The most code snippet in here will include them aswell =)

Furthermore you can use this macros to change some behaviour like the execution speed of rept_task:

#define EBOARD_PWM_SPE 0.2
#define REPT_TASK
void rept_task(void) {
// stuff
}

This will have the effect that REPT_TASK gets called 5 times a second as long as interrupts are enabled!

Something about classes

Without any special macro defined there are four classes available:
All of them can be disabled via

#define EBOARD_NANO 0x1

Overall there are 3 additional classes:

How to use:

SoccerBoard

This is the main class and grants access to the digital IO pins etc. The basic usage is shown in this code:

#include <eBoard.h>
bool toggle = true;
int main() {
for(;;) {
board.power(3,toggle); //Set the Outputstate on pin 3 based on toggle [HIGH if true, LOW if false]
board.sleep(1); //Will sleep for approximately 1s
toggle = !toggle; //Inverting toggle
}
return 0; //Error feedback code - 0 if successful
}

The SoccerBoard-class will take care about pinModes etc. If the assignment fails you may look on the pins set by eBoard: Macros > Pins

Setup main car features

To Control the driving and steering motor(s) you can use either the
{SoccerBoard}.motor(...) shortcut:

#include <eBoard.h>
int main() {
board.motor(0,255); //drives 'forward' with full speed [If it is running in the wrong direction you have to change configs of the speedcontroller]
board.motor(1,0); //Steers Servo with ID1 to position(0) [not recomended ^^]
board.motor(2,250); //Steers Servo with ID2 to position(250) [If this doesn't work you have to reset IDs]
board.sleep(2); //Sleep for approximately 2 seconds
board.motor(0,-255) //drives 'backward' with full speed
board.motor(1,1023) //Steers Servo with ID1 to position(1023) [not recomended ^^]
board.motor(2,100); //Steers Servo with ID2 to position(100)
board.sleep(2); //Sleep for approximately 2 seconds
return 0; //Main Motor will automatically stop when main program is over!
}

Or you can use the SoccerBoard-Way:

#include <eBoard.h>
DynamixelBoard servoBoard(board);
AX12Servo Links(servoBoard,1);
AX12Servo Rechts(servoBoard,2);
//nothing in this brackets will have any effect :D
int main() {
Links.setPosition(500); //When using #EBOARD_CLAMP: set Position of Servo with ID1 to position(500)
Rechts.setPosition(200); //When using #EBOARD_CLAMP: set Position of Servo with ID2 to position(200)
io1.B = HIGH; //sets direction to: 'forward' [If it is running in the wrong direction you have to change configs of the speedcontroller]
io1.C = 108; //sets the speed to 108 [of 255]
io1.write(); //writes the set values to the output
board.sleep(2); //Sleep for approximately 2 seconds
return 0; //Main Motor will automatically stop when main program is over!
}

Setup follow-up car features

If you've set the EBOARD_NANO macro to 0x1 there will be two methods available: